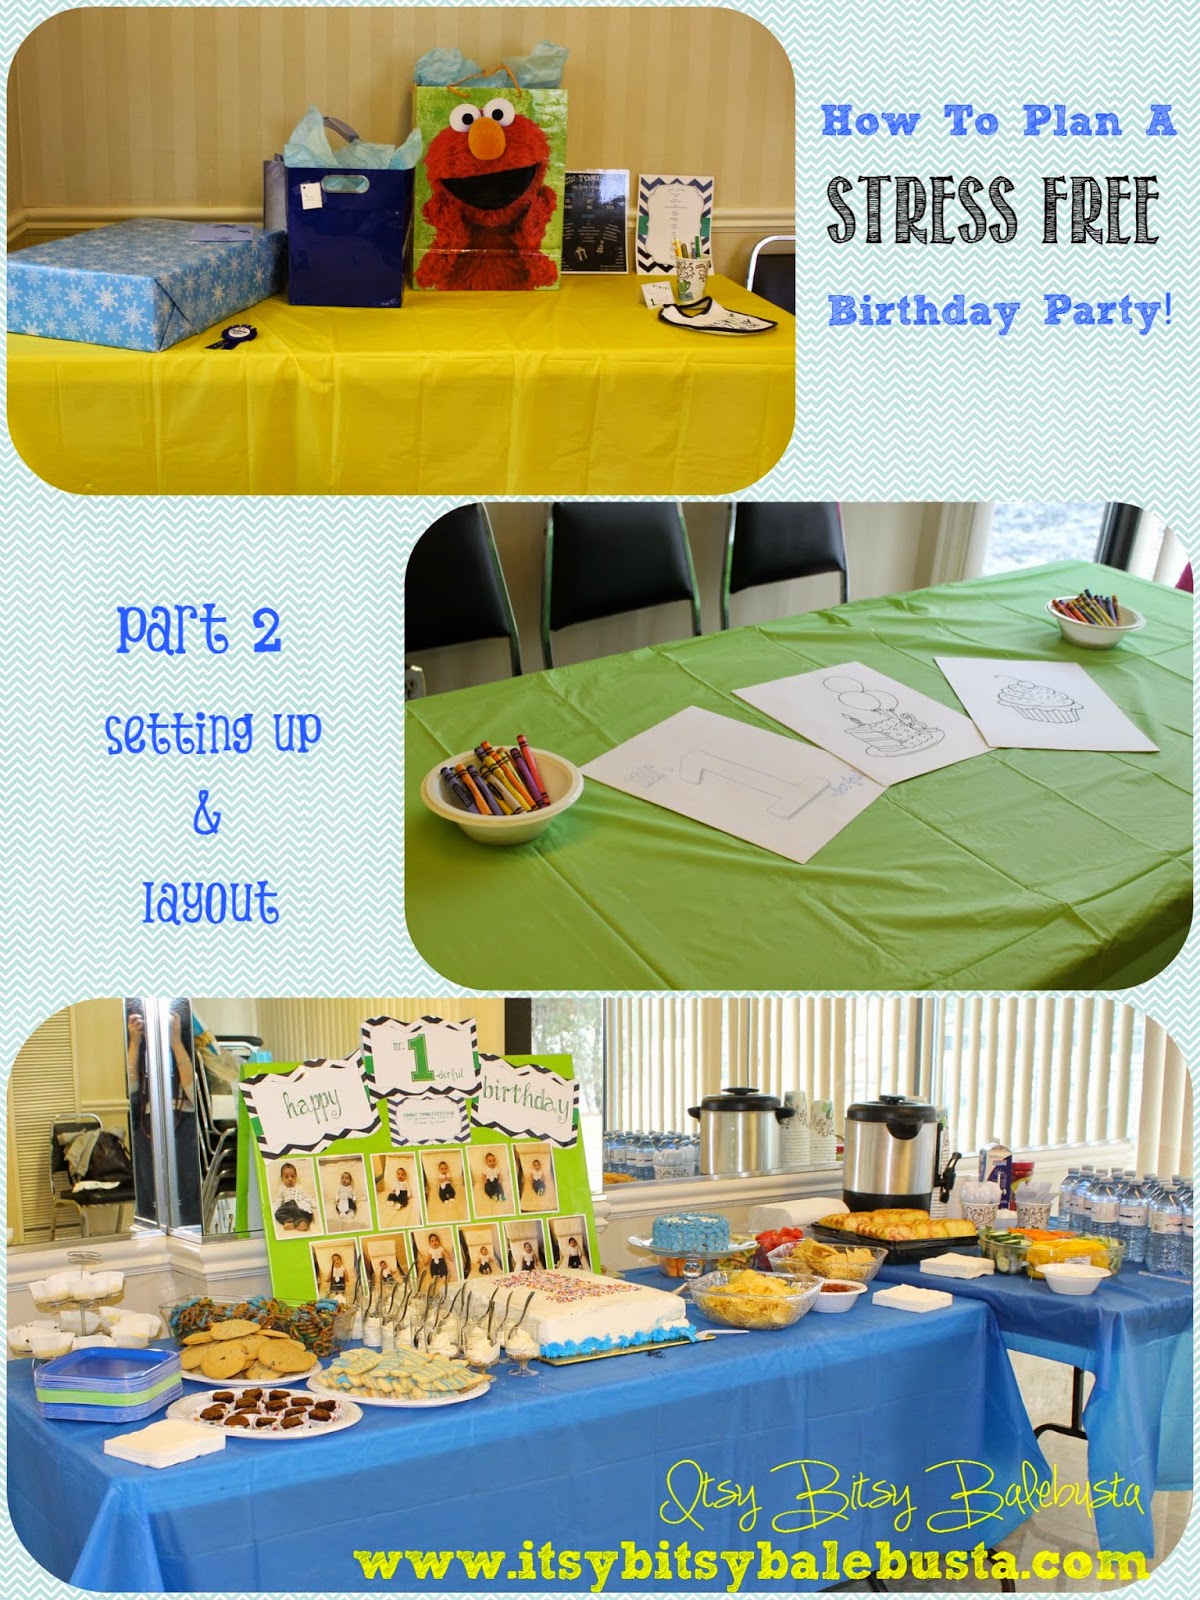
How to Plan A Stress Free Party Part 2: Setting Up & Layout!
This series will provide a comprehensive look at our son’s first birthday party, and serve as a guide filled tips we learned along the way. It's our hope that it'll help make your little one’s special day as minimally stressful as possible! After all, the less time you spend preparing and setting up, the more time you'll have to celebrate and focus on the day! When I searched for tips for Y’s birthday, I couldn't really find anything comprehensive (and especially when it came to boys birthdays!) so although these posts may be a bit lengthy, I hope they give you some ideas and help you with your celebration!
Let’s get started!
After months of going back and forth on a theme, we finally decided to go for a more generic theme rather than characters, and all the ideas we had previously floated around. As much as our son absolutely loves Rio, we kinda figured this would be the only year where he wouldn't straight-up give us a theme, and where we could really, really focus on him and the awesome little boy that he is (rather than on his favorite movie and so on). Gd-willing, there will be plenty of birthdays ahead full of that! It also opened the door for us to create a lot of our own decorations, invitations and so on, without spending money on the party items we had passed in various stores, while attempting to stick to a budget!
And so we decided on Mr. 1-derful!
After the theme was set, we decided to go with blue and green for the color scheme, since it was easy to work with, and plenty of boy birthday ideas I had seen, complemented it well. I also threw in some yellow since it seems to be Y’s favorite color! We purchased plastic tablecloths from the dollar store, together with simple green and blue paper plates. We doubled-up on the quantity needed, in case guests wanted a separate plate for sweets and veggies. At the end of the party, we wrapped up the mess into the tablecloths and disposed of them! Super easy cleanup and nothing to worry about if there were spills or other incidents!
We set the party from 1-3, just long enough to be a drop-in where everyone could enjoy sweets and refreshments but not so long that Y would get fussy or bored. Also, we purposely scheduled it for after his nap time so that he could be well rested! It happened to be Superbowl Sunday, and we wanted it early enough in the day that it wouldn't interfere if our guests had plans. Lastly, we definitely know how valuable Sundays are in general, being one of the only days in the week where we’re really able to get out and take care of errands etc, so we didn't want to impose on anyone’s day off either. The length of time and the timing itself ended up being great, and we were really happy with it. We booked the room from 12-4 to allow an hour for setup and an hour to clean up. In the end, we only needed about 20 minutes to set up – I came prepped with a map of the layout, what would go on each table and had separated items into corresponding large reusable bags for each table, to make setup as smooth as possible. We also had a friend of our's and my family arrive a little early and their help was invaluable! My Mom got some bonus time with Y, while my sister and Dad helped move and set the tables. Cleanup extended a little past our 4 pm deadline, since guests left a little later than 3. All points to consider when booking your space, if you’re having a party outside of home!
The room we rented was a simple party room in a condo building, through an incredible friend of our’s. It was large enough to hold all of our guests comfortably and provided tables and chairs. Living in a small apartment, we didn't want everyone to feel crammed and for kids to have no where to really go. This option offered us the space we needed, as well as the bonus of keeping all of the mess and traffic outside of our home, at a minimal cost. We wanted to have an intimate yet open setting, and other rental options such as indoor play places and larger party rooms compromised that. This option was the clear winner!
The set up was very simple. A large rectangular table with a blue tablecloth against one wall, with a smaller square table attached to it. This was our main table. It hosted the trays of baked goods, our fruit and veggie trays, the cakes (yes cakes, more on that later in the series, when we talk all about the food!), and napkins, plates etc. The small adjoining table held the coffee urn and drinks, together with cups, spoons and so on. It was against a wall on the far side of the room, the first thing you saw when you walked in, but out of the way enough to leave plenty of area to walk around and socialize, or take something from the table without feeling crowded. I didn't want to position it in the middle of the room, (although that layout is great if you have the space, since it allows everyone to walk around and effortlessly take from all angles) since it minimized the amount of space and would be a huge obstacle for all the kiddies moving around! Depending on your guests and the layout of your room a different option may be more suitable, but against a wall on the far side of the room, was the best option for us!
The second table was directly across the room from the main one. It was covered in a yellow table cloth, and was a place to keep all of the gifts, our family and friends so kindly and generously brought for Y. It also held one of my favorite details of his party – a, My First Birthday bib, where all of our guests were welcome to sign their names, as a sort of guest book and memento of Y’s first birthday party! It was a hit and is a cute way for us to be able to look back and remember who was a part of Y’s special day. Full details in our next post!
We brought along Y’s travel high chair that buckles onto a regular seat, so that he would have a secure and steady place to enjoy his cake or take a rest. It also doubled as a great area where guests took turns taking photos with him! After all of the adorable high chair decorations I had seen online, we actually opted to purchase a highchair decorating kit, since it came with the banner for the tray as well as a mat for underneath the high chair, to catch any excess cake or treats. We found one with animals and a “Fun To Be 1” message! It was part of a larger set of decorations, but we felt it was generic enough that it could blend in seamlessly with the rest of our décor! It was an excellent and easy touch to dress up his special seat and the mat helped with clean up at the end (especially since it was a rented room and wiping blue icing off of the floor after a party wasn't something I was interested in doing!).

Let’s get started!
After months of going back and forth on a theme, we finally decided to go for a more generic theme rather than characters, and all the ideas we had previously floated around. As much as our son absolutely loves Rio, we kinda figured this would be the only year where he wouldn't straight-up give us a theme, and where we could really, really focus on him and the awesome little boy that he is (rather than on his favorite movie and so on). Gd-willing, there will be plenty of birthdays ahead full of that! It also opened the door for us to create a lot of our own decorations, invitations and so on, without spending money on the party items we had passed in various stores, while attempting to stick to a budget!
And so we decided on Mr. 1-derful!
After the theme was set, we decided to go with blue and green for the color scheme, since it was easy to work with, and plenty of boy birthday ideas I had seen, complemented it well. I also threw in some yellow since it seems to be Y’s favorite color! We purchased plastic tablecloths from the dollar store, together with simple green and blue paper plates. We doubled-up on the quantity needed, in case guests wanted a separate plate for sweets and veggies. At the end of the party, we wrapped up the mess into the tablecloths and disposed of them! Super easy cleanup and nothing to worry about if there were spills or other incidents!
We set the party from 1-3, just long enough to be a drop-in where everyone could enjoy sweets and refreshments but not so long that Y would get fussy or bored. Also, we purposely scheduled it for after his nap time so that he could be well rested! It happened to be Superbowl Sunday, and we wanted it early enough in the day that it wouldn't interfere if our guests had plans. Lastly, we definitely know how valuable Sundays are in general, being one of the only days in the week where we’re really able to get out and take care of errands etc, so we didn't want to impose on anyone’s day off either. The length of time and the timing itself ended up being great, and we were really happy with it. We booked the room from 12-4 to allow an hour for setup and an hour to clean up. In the end, we only needed about 20 minutes to set up – I came prepped with a map of the layout, what would go on each table and had separated items into corresponding large reusable bags for each table, to make setup as smooth as possible. We also had a friend of our's and my family arrive a little early and their help was invaluable! My Mom got some bonus time with Y, while my sister and Dad helped move and set the tables. Cleanup extended a little past our 4 pm deadline, since guests left a little later than 3. All points to consider when booking your space, if you’re having a party outside of home!
The room we rented was a simple party room in a condo building, through an incredible friend of our’s. It was large enough to hold all of our guests comfortably and provided tables and chairs. Living in a small apartment, we didn't want everyone to feel crammed and for kids to have no where to really go. This option offered us the space we needed, as well as the bonus of keeping all of the mess and traffic outside of our home, at a minimal cost. We wanted to have an intimate yet open setting, and other rental options such as indoor play places and larger party rooms compromised that. This option was the clear winner!
The set up was very simple. A large rectangular table with a blue tablecloth against one wall, with a smaller square table attached to it. This was our main table. It hosted the trays of baked goods, our fruit and veggie trays, the cakes (yes cakes, more on that later in the series, when we talk all about the food!), and napkins, plates etc. The small adjoining table held the coffee urn and drinks, together with cups, spoons and so on. It was against a wall on the far side of the room, the first thing you saw when you walked in, but out of the way enough to leave plenty of area to walk around and socialize, or take something from the table without feeling crowded. I didn't want to position it in the middle of the room, (although that layout is great if you have the space, since it allows everyone to walk around and effortlessly take from all angles) since it minimized the amount of space and would be a huge obstacle for all the kiddies moving around! Depending on your guests and the layout of your room a different option may be more suitable, but against a wall on the far side of the room, was the best option for us!
The second table was directly across the room from the main one. It was covered in a yellow table cloth, and was a place to keep all of the gifts, our family and friends so kindly and generously brought for Y. It also held one of my favorite details of his party – a, My First Birthday bib, where all of our guests were welcome to sign their names, as a sort of guest book and memento of Y’s first birthday party! It was a hit and is a cute way for us to be able to look back and remember who was a part of Y’s special day. Full details in our next post!
Next up, and possibly the best idea of the three tables, was the coloring table! I searched Pinterest and found a variety of coloring sheets and printed out approximately 2-3 copies per child, of each one (just in case someone made a “mistake” or really liked a particular one, there would be enough to go around). The specific sheets we used can be found here and here. I also created our own coloring sheet, using a simple word document. I used the same fonts M used to create the motif for the invitation, and simply applied a word art filter to make them just an outline. It created a unique coloring page, that included the theme perfectly and easily! I loved this aspect of the party, because it gave the children something to do while their parents got to socialize, it was age-appropriate and everyone from the two-year-old to the eight-year-old were super excited to color! At the end we were given a whole bunch of beautifully colored-in sheets with notes to Y, which I hope to compile into a little book for him! It was a cute way for the kids to keep busy and contribute to the party and it helped to avoid any running around or boredom! Definitely a hit! Again, all it required was a plastic tablecloth, 2-3 of each coloring page per child and 2 boxes of crayons from our local dollar store (since it’s inevitable that more than one child will want the same color at the same time!).
We brought along Y’s travel high chair that buckles onto a regular seat, so that he would have a secure and steady place to enjoy his cake or take a rest. It also doubled as a great area where guests took turns taking photos with him! After all of the adorable high chair decorations I had seen online, we actually opted to purchase a highchair decorating kit, since it came with the banner for the tray as well as a mat for underneath the high chair, to catch any excess cake or treats. We found one with animals and a “Fun To Be 1” message! It was part of a larger set of decorations, but we felt it was generic enough that it could blend in seamlessly with the rest of our décor! It was an excellent and easy touch to dress up his special seat and the mat helped with clean up at the end (especially since it was a rented room and wiping blue icing off of the floor after a party wasn't something I was interested in doing!).
I hope this has given you some ideas to help make the setup and layout for your little one’s party less stressful and more attainable! Join us for our next post where we fill you in on the decorations and how we opted for quick and easy homemade pieces that added a personal touch to the room and celebrated our little boy’s milestones over his first year!
*All brands and links found throughout the post, are not associated with Itsy Bitsy Balebusta and are not sponsored in any way! They're simply the items we found and included in our celebration, and I've linked further information regarding them solely for your convenience!*
*All brands and links found throughout the post, are not associated with Itsy Bitsy Balebusta and are not sponsored in any way! They're simply the items we found and included in our celebration, and I've linked further information regarding them solely for your convenience!*


Comments
Post a Comment